
Where have all my photos gone?

Sometimes, one of the main things I go out to help people with is their photos. Whether it's understanding where they all are, how to get them from one device to another, or simply making sure they're safely backed up.
And that last part is particularly important to me.
Over the years, we accumulate hundreds, if not thousands, of photos. They might be family holidays, birthdays, weddings, children growing up, or just everyday moments we want to remember. And yes, even those photos of food, a book we want to read, a shopping label we don't want to forget, or where we parked the car!
But unlike many other files on our computers, photos aren't something we can simply go back in time and take again. Losing years of photos can be quite an emotional loss.
That's why, as part of my work, I always like to make sure my clients understand where their photos are stored and, importantly, that they have a reliable backup.
"Oh, it's OK, my photos are backed up in iCloud!"
This is something I hear quite often when visiting clients.
And while iCloud Photos is a very handy service, there's one important thing to understand:
iCloud Photos is primarily a syncing service, not a separate backup service.
I've touched on this in previous articles about iCloud and backups on the MacWizardry Tips page, but it's worth explaining again.
When you use iCloud Photos, your photos and videos are kept in sync between your devices. So, for example, if you take a photo on your iPhone while you're away on holiday, it uploads to iCloud and can then appear on your iPad and Mac automatically.
That's fantastic! No cables, no manually transferring photos, and everything is generally kept up to date.
But there's a catch.
What happens if you delete a photo?
Because iCloud Photos keeps everything in sync, deleting a photo from one device also deletes it from the other devices using the same iCloud Photos library.
So if you delete a photo from your iPhone, it will also disappear from iCloud, your iPad and your Mac.
Apple does provide a Recently Deleted album, where deleted photos can generally be recovered for up to 30 days.
But what happens if you accidentally delete some photos and don't realise they're missing until three or four months later?
By then, they may be permanently gone from iCloud Photos.
And that's why I always recommend having a separate backup of your photos, rather than relying entirely on iCloud.
Where are your photos actually stored?
This is another area that can cause confusion.
When you're using iCloud Photos, your full-quality original photos and videos are stored in iCloud.
But depending on your settings, your iPhone, iPad or Mac might not have full copies of everything stored locally.
Apple provides an option called Optimise Storage, which allows your device to keep smaller, space-saving versions of photos while the full-quality originals remain in iCloud.
When you want to view or edit a particular photo, your device can download the original as needed.
It's a clever way of saving space, particularly on an iPhone that might not have a large amount of storage.
However, it also means that simply having photos visible on your device doesn't necessarily mean you have all the full-quality originals stored there.
And that's where a couple of settings I regularly recommend checking can make a difference.
Keeping the original photos on your iPhone
On an iPhone, you can check your iCloud Photos settings by opening:
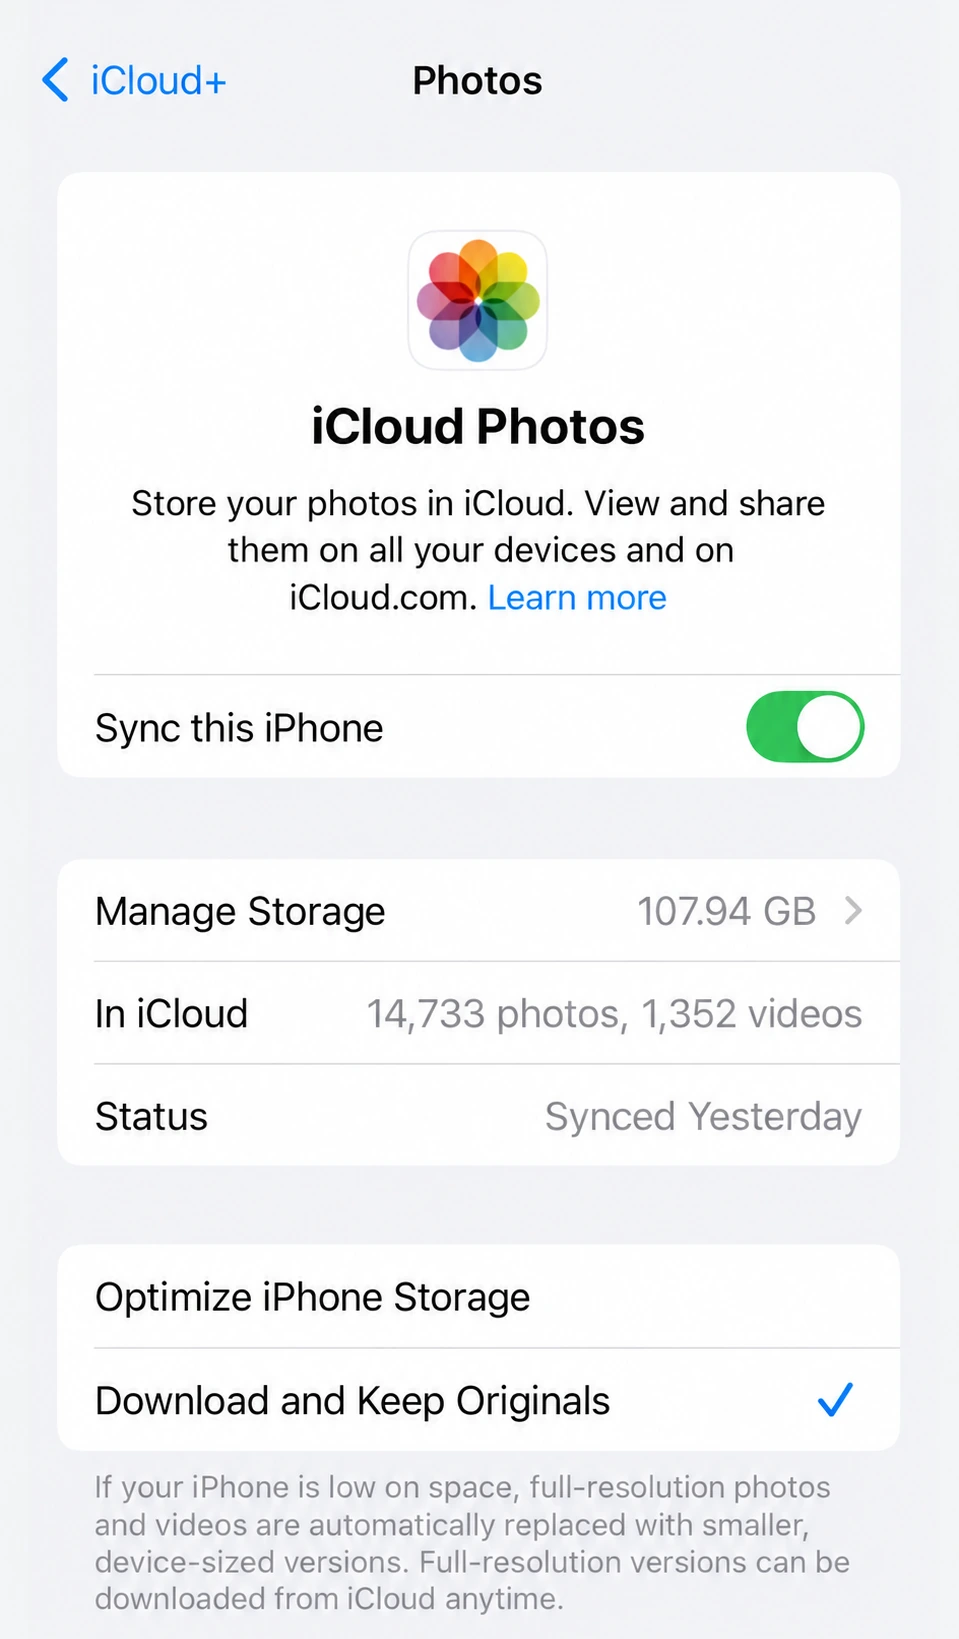
Settings → Your Name → iCloud → Photos
If Sync this iPhone is enabled, your iPhone is using iCloud Photos.
Depending on your version of iOS, you should see options for Optimise iPhone Storage and Download and Keep Originals. On newer versions, these options may be under an additional storage setting.
Where practical, I prefer using Download and Keep Originals, as it means your iPhone can keep full-quality copies of your photos and videos locally.
But there's something important to check first!
A quick note about storage space
Before changing this setting, you must make sure your iPhone or iPad has enough available storage to hold all your photos and videos.
For example, if you have over 200GB of photos stored in iCloud, but only have a 128GB iPhone or iPad, then using "Download and Keep Originals" simply isn't going to work. Your device doesn't have enough room to store everything.
So it's worth doing a little homework before changing this setting.
Check how much space your photos are using and how much storage is available on your iPhone or iPad.
If you don't have enough room, you may need to leave Optimise iPhone Storage selected instead.
And that's perfectly fine, provided you have another reliable way of keeping your original photos backed up.
Also remember that having full-quality photos stored on your iPhone isn't, by itself, a backup. If the iPhone is lost, stolen or damaged, those local copies could be lost too.
Keeping the original photos on your Mac
This is a setting I particularly like to check when helping clients who use iCloud Photos.
On your Mac:
- Open the Photos application.
- From the Photos menu, select Settings.
- Click iCloud at the top of the window.
- If iCloud Photos is enabled, check the storage options underneath.
- Select Download Originals to this Mac, rather than Optimise Mac Storage.
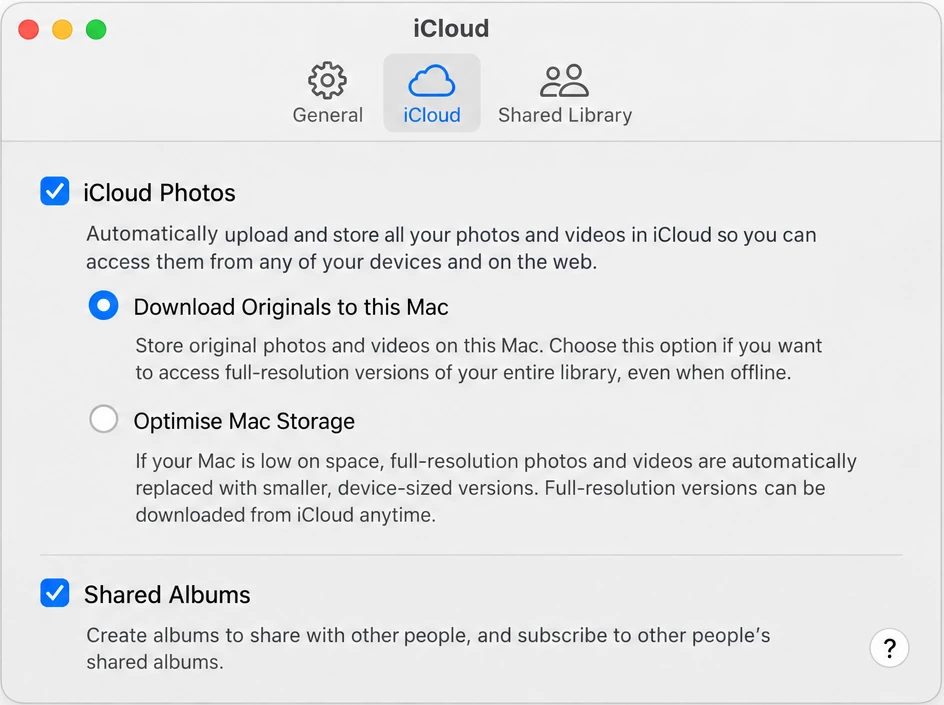
With this setting enabled, your Mac will download and keep full-quality copies of your photos and videos, again - provided it has enough available storage.
Depending on the size of your photo library and your internet connection, downloading everything might take quite some time.
And this is where having a regular backup becomes particularly valuable.
If your Mac is using Time Machine, and your Photos library is included in those backups, you have an additional copy of the photos that were stored locally when the backup was made.
One important point: Make sure the originals have finished downloading and that Time Machine has completed a backup. Simply selecting the setting doesn't mean everything has already been saved.
And while Time Machine is excellent for backing up your Mac, I wouldn't rely on it alone to recover photos deleted from iCloud months or years earlier. Keeping a separate archive of particularly important photos provides another layer of protection.
Phew! A few settings to check, but I think they're worthwhile.
What if you're not using iCloud Photos?
Not everyone wants to use iCloud Photos, and that's perfectly fine too.
Some of my clients prefer to transfer photos manually from their iPhone to their Mac. Others simply don't want another monthly subscription to pay.
If you're not using iCloud Photos, transferring photos to your Mac is generally quite straightforward.
First, connect your iPhone to your Mac using a suitable USB cable. Depending on your iPhone model, this might be a USB-C or Lightning cable.
Then:
- Open the Photos application on your Mac, if it doesn't open automatically.
- Look down the left-hand side under Devices, where your iPhone should appear.
- Click your iPhone to see the photos available for importing.
- Click Import All New Items, usually towards the top-right of the window.
Your Mac will then start importing the new photos.
Depending on how many photos you have, this might take just a few minutes or considerably longer.
You'll be able to see the import progress as it works through them.
There's also a handy little setting on the import screen called Open Photos for this device. If you tick that, Photos can open automatically the next time you connect your iPhone.
Once the import has finished, your photos are stored in your Mac's Photos library.
And if you're using Time Machine, those imported photos can then be included in your Mac's regular backups.
Just make sure the backup has actually completed.
Can you use iCloud Photos on your iPhone but not your Mac?
Yes, you can.
You don't have to use iCloud Photos on every Apple device you own.
For example, you might prefer to use iCloud Photos on your iPhone so your photos are uploaded automatically, but leave iCloud Photos switched off on your Mac and import photos manually instead.
This can be particularly useful with an iPhone, as it's generally more portable than a computer that stays at home.
If you're overseas or travelling and something happens to your iPhone, your photos should already be in iCloud, provided they've had a chance to upload over Wi-Fi or mobile data.
However, there is something to be aware of.
If your iPhone is using Optimise iPhone Storage, some of the original photos may only be stored in iCloud rather than on the iPhone itself.
That can make manually importing everything into your Mac more complicated, because the originals may not be available locally to import.
So while you can mix and match these arrangements, it's important to understand how they work before relying on them.
For many people, using iCloud Photos on both the iPhone and Mac, with Download Originals to this Mac enabled and a reliable backup in place, is a simpler arrangement.
What happens when you get a new iPhone or Mac?
This is another question that comes up regularly when I'm helping clients set up a new device.
If you're using iCloud Photos, moving to a new iPhone or Mac can be relatively easy.
Once you've signed in with your Apple Account and enabled iCloud Photos, your photo library can begin syncing to the new device.
Depending on how many photos you have, your internet speed and the available storage, this might take a little while.
You may see your photos appearing quite quickly, even though the full-quality originals haven't all downloaded yet.
But if you're not using iCloud Photos, you'll need to make sure your photos are transferred another way.
For example, you might restore your new iPhone from a backup of your previous iPhone, use a direct iPhone-to-iPhone transfer, or transfer your Mac's Photos library as part of moving your information to a new Mac.
And here's another reason I always like to check backups before anyone changes computers or phones!
Never assume all your photos have transferred correctly until you've checked them.
It's much better to spend a few extra minutes checking everything before erasing, trading in or giving away your old device.
It's also worthwhile making sure that when you upgrade from an older iPhone to a newer model, you're buying one with enough storage space to hold your current photos and allow room for more in the future.
For example, if your old iPhone was a 256GB model and was getting close to full, it might be worth considering a 512GB model or larger, depending on how you use it.
Alternatively, you could archive older photos onto your computer or an external drive to free up space on your iPhone.
Just remember: If you're using iCloud Photos, deleting photos from your iPhone will also delete them from iCloud and your other synced devices. Make sure anything you're removing has been safely exported and backed up elsewhere first.
What about the cost of iCloud storage?
Of course, there's another consideration when using iCloud Photos - the ongoing cost.
Apple provides a limited amount of free iCloud storage, but if you have a large collection of photos and videos, you'll probably need a paid iCloud+ storage plan.
And as your photo library grows, you may eventually need to move to a larger plan. And so on.
For some people, the convenience of having their photos automatically synced across their devices is well worth the monthly cost.
Others would rather avoid another subscription and are happy to transfer their photos manually.
There's no single answer that suits everyone.
So, which way is best?
That's really something I discuss with each client, because everyone's requirements are different.
Some people love the convenience of iCloud Photos and are quite happy to pay for the storage. Others prefer to keep everything on their computer and manually transfer photos when needed.
Both approaches have their advantages and disadvantages.
But whichever way you choose to manage your photos, the most important thing is to understand where they're stored, how they're being transferred and whether you have a reliable, separate backup.
Because losing a computer or phone is inconvenient, but losing years of irreplaceable photos can be heartbreaking.
And while we can't go back in time and take those photos again, a little preparation now can make a huge difference if something goes wrong later.
My advice? Don't wait until you've lost your photos to find out whether they're backed up!
Further information from Apple
If you'd like to read a little more about iCloud Photos and how the Photos application works, Apple also has some helpful information available:
Daniel Kerr - MacWizardry